Serverless Back-End for React - Your Introduction to Serverless Architecture
What's the opposite of the boy who cried wolf? The boy who cried that something amazing was coming? The boy who cried free pizza?
Serverless architecture might be the free pizza equivalent of web technologies in terms of how amazing it is. It's still very new tech, but the more I learn about it and use it, the more I am convinced that it's the future of web development.
In this post:
I'm going to go over what serverless architecture is and how using it differs from working with a traditional web framework. I'll also go over the benefits of serverless.
Then, I'll show you how you can make and deploy a simple serverless back-end for a React app using AWS Lambda (Amazons's serverless platform).
And finally, to wrap it up, I'll go over some of the drawbacks of the serverless architecture.
Side note: I'm going to be using Amazon's platform for all of the examples in this post, but be aware that there are other serverless providers out there. The implementation details are going to be different depending on which one you use.
Let's get started!
#What is serverless?
Okay, okay, technically the term serverless is a little misleading. The term serverless refers to FaaS or Function as a Service. We call it serverless because, although these functions still run on a server somewhere, you don't have to pay for, set up, or maintain a server yourself.
FaaS is a form of event based computing. Basically, you configure functions to be triggered by specific events. These functions are executed in little (or big) containers containing all of the dependencies they need to run.
Here is the cool part — these functions can be triggered by all sorts of events.
Here are a few of the events AWS Lambda can be triggered by:
- Amazon S3 Events — like when an object is added or deleted from S3.
- Amazon Simple Email Service — when you receive an email.
- Amazon Alexa — yes, you can trigger functions by talking to Alexa.
- Amazon DynamoDB — trigger when data changes in your database.
- Scheduled Events — self explanatory.
- Amazon API Gateway — the Holy Grail!
Amazon API Gateway! You can trigger these events using an API. Aaaaand, not only can you trigger a function with an API request, that function can send back a response! That's a back-end!
When you break down any web framework, even big ones like Rails, they all boil down each request to the execution and return value of one function. In the case of Rails, each request is mapped to one controller action, and all of the rest of the code is just helping the controller build the response.
It seems a little strange at first to think about web apps in terms of individual functions, but all of the other parts of the framework are there, they are just being handled by the infastructure.
A good example of this is the routing. In serverless you use a configuration file to tell the infastructure which API events to connect to which functions, so none of your actual code gets involved in the routing.
#Why Serverless
Cost
One of the biggest benefits of serverless is cost. You only pay for the request and runtime of the function. This means no more paying for idle servers. This ends up saving some companies a lot of money.
Scalability
Serverless solves most scaling problems because each function is its own little microservice that can scale automatically by the provider.
Some of these other benefits are pretty subjective, but they come up frequently in discussions of serverless online.
Time to Market
One claimed benefit is a faster time to market. This actually makes sense. You save a lot of time not having to worry about dev ops, and some of the things you used to have to write code for are handled by the infastructure, leaving you more time to develop the important parts of your application.
Decreased Software Complexity
Of course it's still possible to write bad, tightly coupled code in serverless, but splitting your application into distinct functions helps you write better, loosely coupled code, leading to less complex software.
Shorter Release Cycles
If everything is loosely coupled, it can mean shorter release cycles.
Industry Direction
Another why is the fact that this seems to be the way the industry is heading. For a while now, the industry has been trending hard towards bigger front-ends. As front-end frameworks like Angular and React have been doing more and more of the heavy lifting for the client, the back-ends for web apps have been shrinking. Serverless seems to be testing just how small a back-end can be.
#How
Here is the moment you've been waiting for!
In preparation for this post, I built a little React app called Business Cardistry. The app lets people design colorful business cards.
Now, I want this app to let users actually download PDFs of their business card design. To do that, I am going to need a little back-end processing. Specifically, I want one endpoint that will receive the HTML of the business card design and return a URL the user can use to download a PDF of the design.
Before we begin, let's take a moment to appreciate the fact that we are going to be sending HTML from the client to the back-end. lol.
Here is our roadmap:
- Set up and create a new project
- Deploy and send a test request
- Set up an S3 Bucket
- Code our function
- Testing and final deployment
Let's get started...
#Set up and Create a New Project
The Serverless Toolkit over at serverless.com has an amazing framework with incredible documentation, and that is what we are going to be using today.
You should already have node v6.5.0 or higher installed.
First, install the serverless CLI: npm install -g serverless.
Then, follow these instructions to set up your AWS account and credentials.
After following those instructions, you should have an Access Key ID, and a Secret Access Key, and both should be added to your shell environment under the variable names AWS_ACCESS_KEY_ID and AWS_SECRET_ACCESS_KEY. This is where the serverless CLI looks for credentials when deploying.
Now that you have everything set up, let's create our back-end by running this command:
serverless create --template aws-nodejs --path business-cardistry
This should create a new folder for us called business-cardistry. Let's go into that folder and have a look around.
$ cd business-cardistry
$ ls -lah
total 24
drwxr-xr-x    5 nmajor  staff   160B Dec 27 13:37 .
drwxr-xr-x  110 nmajor  staff   3.4K Dec 27 13:37 ..
-rw-r--r--    1 nmajor  staff    86B Dec 27 13:37 .gitignore
-rw-r--r--    1 nmajor  staff   466B Dec 27 13:37 handler.js
-rw-r--r--    1 nmajor  staff   2.8K Dec 27 13:37 serverless.yml
As you can see, aside from .gitignore, we only have two files, handler.js and serverless.yml. Later, this file structure can grow into any structure we need to keep our code organized, but everything comes back to these two files.
The best way to learn how these files work is to dive in and change them a bit to see how they work.
I opened up serverless.yml and removed all of the comments, so now we have something like this (I added some annotations):
# serverless.yml

service: business-cardistry # Name of our service

provider:
  name: aws # AWS is our FaaS provider
  runtime: nodejs6.10 # The language our functions are using

functions:  # This is our list of functions
  hello:  # We have a function named hello
    handler: handler.hello  # references a function called hello in handler.js
Let's modify our hello function by renaming it to pdf and connecting it to an API event. We do that by modifying our functions section to look like this:
functions:
  pdf:
    handler: handler.pdf
    events:
      - http:
          path: pdf
          method: post
As you can see, we added an events level to our hello section. We set the path to pdf and the method to post. This means we can trigger this event by sending a post request to some-url-goes-here/pdf. It looks a lot like a routing system in a traditional web framework, but again, it's being handled at the infrastructure level.
Now, let's take a look at handler.js.
# handler.js
'use strict';

module.exports.hello = (event, context, callback) => {
  const response = {
    statusCode: 200,
    body: JSON.stringify({
      message: 'Go Serverless v1.0! Your function executed successfully!',
      input: event,
    }),
  };

  callback(null, response);
};
Again, let's modify it by changing hello to pdf. Let's also change the body to only return the message. Now, the file should look like this:
'use strict';

module.exports.pdf = (event, context, callback) => {
  const response = {
    statusCode: 200,
    body: JSON.stringify({
      message: 'Go Serverless v1.0! Your function executed successfully!',
    }),
  };

  callback(null, response);
};
Alright, now serverless.yml defines a function called pdf, which is connected to the pdf function in handler.js. We now should have everything we need to deploy and send a request.
#Deploy and Send a Test Request
There actually isn't any straightforward way to run your serverless script locally, so we actually need to deploy it to test it out.
You can deploy it with the command:
serverless deploy -s devThe -s dev part tells it to set the stage to dev. The stage is how we differentiate production code from development code. We will deploy it to the production stage when everything is working.
You should see something like this when you deploy:
$ serverless deploy -s dev
Serverless: Packaging service...
Serverless: Excluding development dependencies...
Serverless: Uploading CloudFormation file to S3...
Serverless: Uploading artifacts...
Serverless: Uploading service .zip file to S3 (327 B)...
Serverless: Validating template...
Serverless: Updating Stack...
Serverless: Checking Stack update progress...
...............................
Serverless: Stack update finished...
Service Information
service: business-cardistry
stage: dev
region: us-east-1
stack: business-cardistry-dev
api keys:
  None
endpoints:
  POST - https://o20pczjzbl.execute-api.us-east-1.amazonaws.com/dev/pdf
functions:
  pdf: business-cardistry-dev-pdf
There is the URL for our endpoint. Let's try it out!
$ curl -X POST https://o20pczjzbl.execute-api.us-east-1.amazonaws.com/dev/pdf
{"message":"Go Serverless v1.0! Your function executed successfully!"}
It works! I'm still blown away by how easy that is.
#Set Up an S3 Bucket
Because we are going to be sending back a link that the user can use to download their business card, we need to upload the PDFs to S3. Let's quickly set up an S3 bucket with the proper permissions.
First, let's talk about permissions. Lambdas have an execution role that they assume when they run. The permissions the execution role has will determine which AWS services (like S3) our Lambda function can access.
By default, every new Lambda function gets its own new role, we need to first get the Role ARN of the new role that was created for our function. The Role ARN is the ID of the role that we will use to give that role access to S3.
Later, when we deploy a production function, we will change the execution role of the production function to match dev role which will give the production function the same access that the dev function has.
But first, we need that Role ARN.
Log in to your AWS console and go to the Lambda service.
You should see our function on the list. Go ahead and click it.
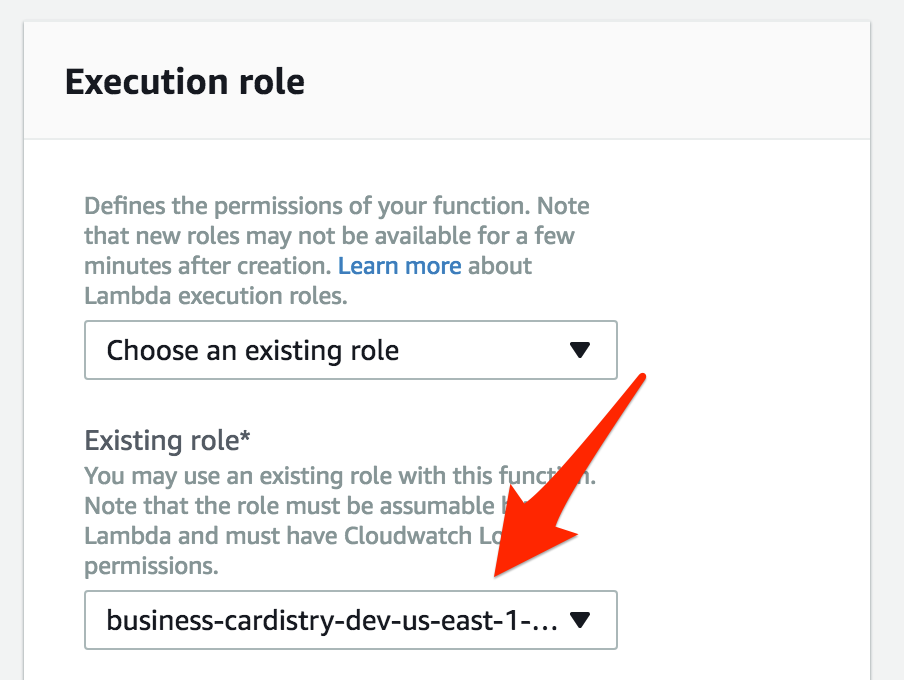
Scroll down to the section that says "Execution Role" and you should see the role that is currently selected. Don't change it — we just needed to see the name of the role.
Now, get the Role ARN by going to the IAM service in the AWS console, click on "Roles" in the sidebar, and select the role for the function. You should see the "Role ARN" at the top of the role page.
Or, if you have the AWS CLI installed, you can get the Role ARN by running this command:
aws iam get-role --role-name name-of-role
The Role ARN should look something like this:
arn:aws:iam::525814828111:role/business-cardistry-dev-us-east-1-lambdaRole
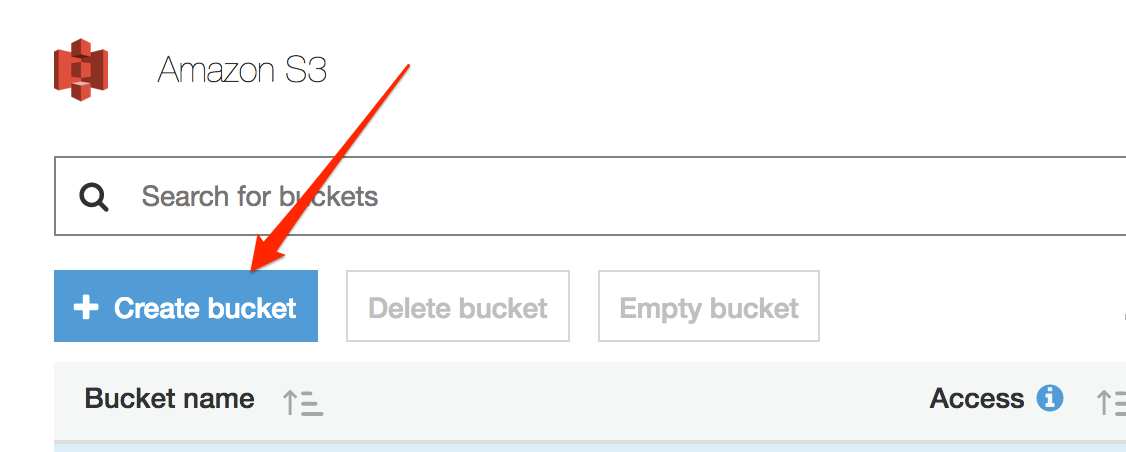
Now, go to the S3 service.
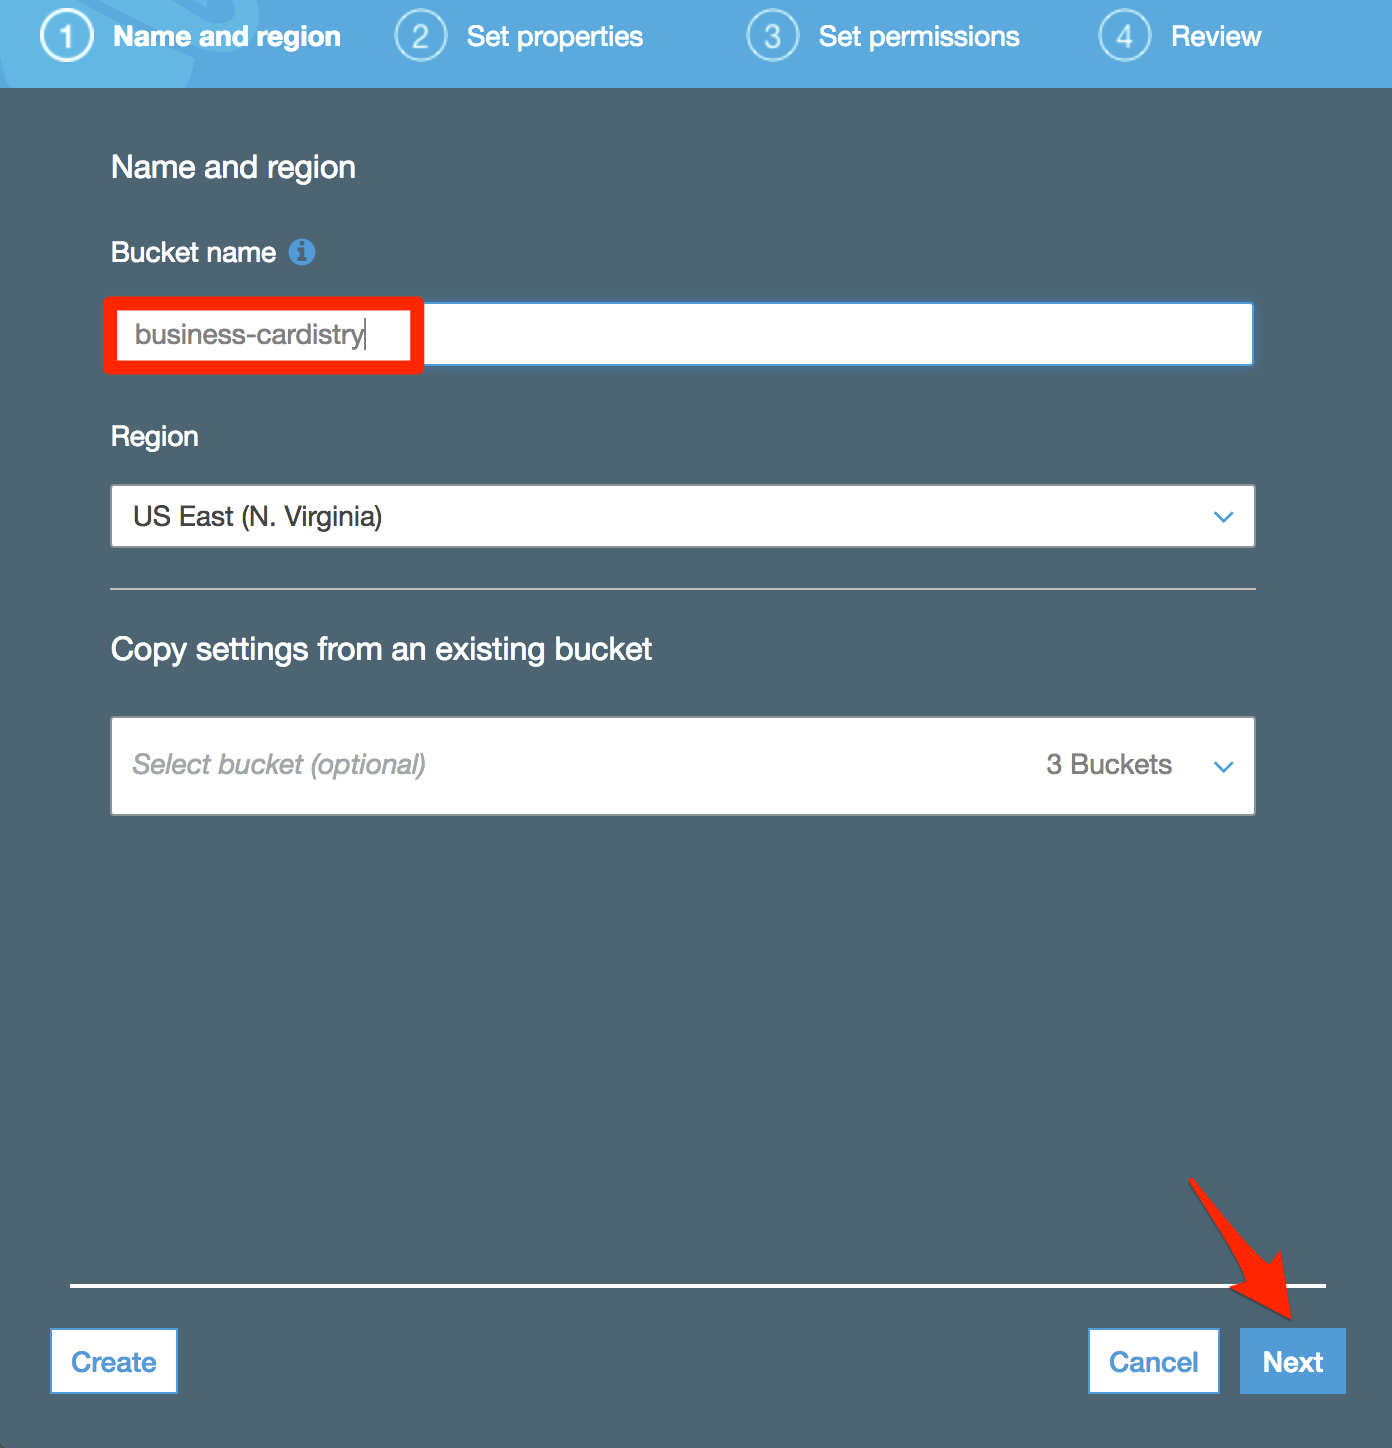
Click "Create Bucket."
Give the bucket a name but leave everything else at its default value by clicking "Next," "Next," "Next," "Create Bucket."
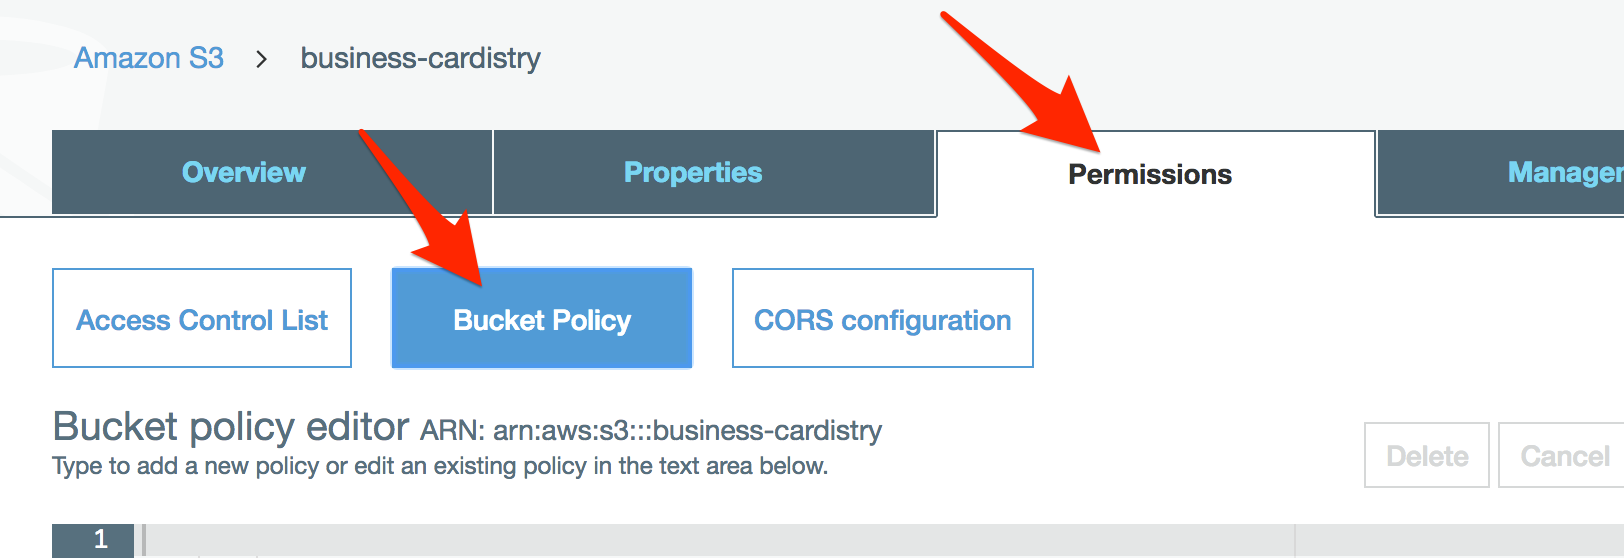
Then, click on your newly created bucket.
Select the Permissions tab, then Bucket Policy.
Paste this into the editor. Be sure to replace role-goes-here with the Role ARN.
{
    "Version": "2012-10-17",
    "Statement": [
        {
            "Sid": "AllowPutForAllS3TestfilesLambda",
            "Effect": "Allow",
            "Principal": {
                "AWS": "role-goes-here"
            },
            "Action": "s3:*",
            "Resource": "arn:aws:s3:::business-cardistry/*"
        }
    ]
}
Alright, this policy allows our custom role to perform all S3 actions on our new S3 bucket. S3 should be good to go!
#Code Our Function
Okay, now we can get to coding. Let's make our pdf function. It needs to receive some HTML, process it into a PDF file buffer, then then upload that buffer to S3.
Let's initialize npm and add some dependencies.
$ npm init -y
$ npm install --save html-pdf aws-sdk shortid
The html-pdf library we are using requires the program phantomjs to be available as an executable binary. Normally, if we were running this script on a server, we would just install phantomjs on the server. Because this is serverless, we need to make sure that the runtime context has access to the phantomjs executable binary.
The way I handled this was to download the binary and put it into a bin folder in the project root.
Then, I made sure to add this to the serverless.yml file:
package:
  include:
    - bin/phantomjs
Now, when the function is deployed, it grabs that binary and uploads it while preserving its permissions and making it available in the runtime environment of the function.
Okay. Let's get to the code. Here is what my pdf function looks like:
'use strict';

const pdf = require('html-pdf');
const path = require('path');
const AWS = require('aws-sdk');
const shortid = require('shortid');

module.exports.pdf = (event, context, callback) => {
  const html = event.body;
  pdf.create(html, {
    height: '200px',
    width: '350px',
    phantomPath: path.resolve(process.env.LAMBDA_TASK_ROOT, 'bin/phantomjs'),
  }).toBuffer((err, buffer) => {
    if (err) return console.log(err);

    const fileKey = `cards/${shortid.generate()}.pdf`;
    const bucket = 'business-cardistry';

    const s3 = new AWS.S3();
    s3.putObject({
      Bucket: bucket,
      Key: fileKey,
      Body: buffer,
      ACL: 'public-read'
    },function (resp) {
      const fileUrl = s3.getSignedUrl('getObject', {
        Bucket: bucket,
        Key: fileKey,
        Expires: 60,
      });

      callback(null, {
        statusCode: 200,
        headers: {
          'Content-Type' : 'application/json',
          'Access-Control-Allow-Origin' : '*',
        },
        body: JSON.stringify({ fileUrl }),
      });
    });
  });
};
I'm not going to go into the code too deeply, but it takes the body of the request and uses it to generate a PDF buffer. It then uploads the buffer to S3 and returns a signed URL for the uploaded object.
You see the line that says path.resolve(process.env.LAMBDA_TASK_ROOT, 'bin/phantomjs')? This is how we reference that phantomjs executable binary.
You'll notice that we don't need to specify any AWS credentials. It automatically gets the credentials from the execution role.
#Testing and Final Deployment
Since this endpoint simply receives HTML and returns a filepath, we should still be able to test it with a curl command. First, let's deploy to dev again.
serverless deploy -s devThe above deploy command will deploy the whole project. To deploy only one function, you can use the command:
serverless deploy function -f pdf -s devIf you run into any errors, you can check the logs for the pdf function with this command:
logs -f pdf -s devNow we can test it by sending another curl request with a string of HTML
$ curl -d '<h1>Hello PDF!</h1>' -X POST https://o20pczjzbl.execute-api.us-east-1.amazonaws.com/dev/pdf
{"fileUrl":"https://business-cardis...j2hJHSBQ%3D%3D"}
It works! When I paste in the fileUrl link into a browser, it downloads a PDF that looks like this:
Which is exactly what we expect.
So now, let's deploy in production!
$ serverless deploy -s production
Serverless: Packaging service...
Serverless: Excluding development dependencies...
Serverless: Creating Stack...
Serverless: Checking Stack create progress...
.....
Serverless: Stack create finished...
Serverless: Uploading CloudFormation file to S3...
Serverless: Uploading artifacts...
Serverless: Uploading service .zip file to S3 (35.56 MB)...
Serverless: Validating template...
Serverless: Updating Stack...
Serverless: Checking Stack update progress...
..............................
Serverless: Stack update finished...
Service Information
service: business-cardistry
stage: production
region: us-east-1
stack: business-cardistry-production
api keys:
  None
endpoints:
  POST - https://8103v1xvqk.execute-api.us-east-1.amazonaws.com/production/pdf
functions:
  pdf: business-cardistry-production-pdf
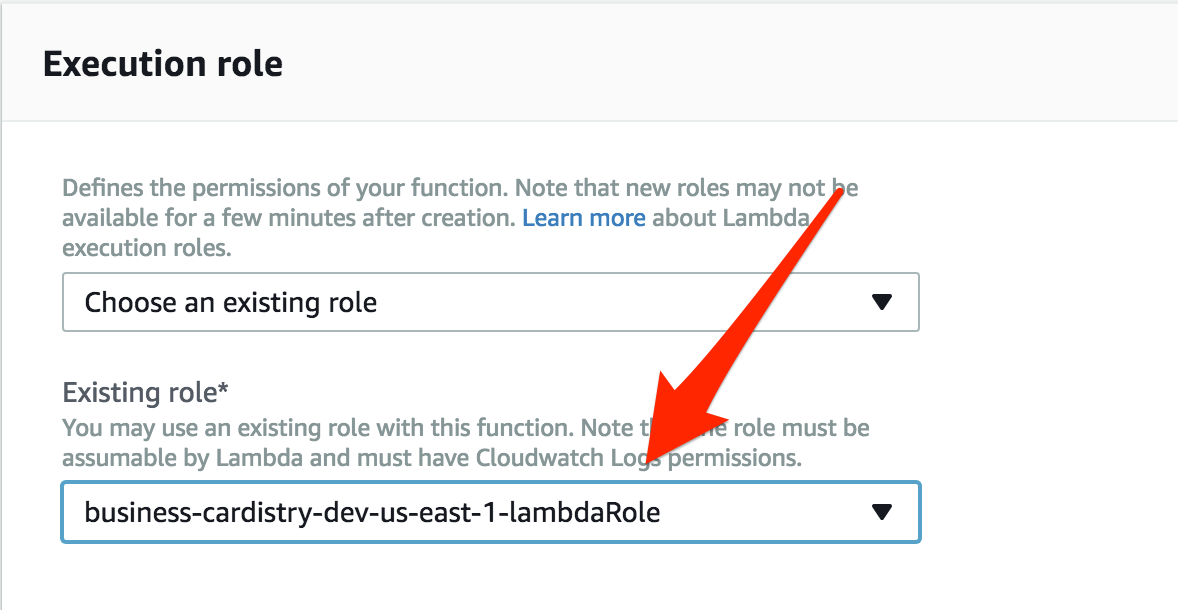
Now, this created a whole new function in Lambda, so remember all of that talk about execution roles? We need to change the execution role of the production function to match the role of the dev function. That way the production function will have access to S3 as well..
So go back to the Lambda page in AWS, click on the new production function that was just created, and change the Execution Role to the dev role:
Once that's done, we can double check the production endpoint.
    $ curl -d '<h1>Hello PDF!</h1>' -X POST https://8103v1xvqk.execute-api.us-east-1.amazonaws.com/production/pdf
    {"fileUrl":"https://business-cardis...j2hJHSBQ%3D%3D"}
Aaaaaand it works! Now after modifying the request URL in my React code, my app is complete!
Be sure to check out cardistry.nmajor.com to see it in action.
I know this was just a simple example with one endpoint, but this same process could be used to build dozens of endpoints for almost any app. I hope this gives you a good idea of what's possible with serverless, and how easy and powerful it can be!
#Limitations and Drawbacks of Serverless
As awesome as serverless is, there are some limitations and drawbacks:
Latency
Although AWS Lambda is designed to execute functions in milliseconds, you do have some added latency when using serverless. However, we are talking about a few hundred added milliseconds. For most web applications, it's not going to be an issue, but if latency is really important for your project, it's something you are going to want to consider.
Vendor Lock-in Because serverless relies so heavily on the infrastructure and the supporting services, but you may need to re-write large parts of your application to move it to a different provider.
Black Box
Many of the parts of your application are out of your control, so when things go wrong or if you hit an edge use-case with your app, you have little control over your ability to resolve it yourself.
New Tech
Serverless is still in its infancy, so, as with any new technology, great care should be used when deciding whether or not to jump on the bandwagon early.
#Conclusion
I believe serverless is the next big thing in web development. So much in web development is the same. Every framework solves many of the same problems in the same way. Serverless is solving those problems at the infrastructural level, leaving you free to work on the important and different parts of your App.
Combine that with cost and scalability benefits, and the fact that there are so many amazing front-end frameworks like React, and the days of traditional back-end frameworks are numbered.
#Other Resources:
- serverless-stack.com — A comprehensive tutorial on building and deploying full-stack apps using Serverless and React on AWS.
- serverless.com — Great documentation, community, and other resources.

